How to start: your first list, step by step
Ten steps from an empty account to a downloaded file, in plain English, with a screenshot of every screen. No video, no jargon — read it in about ten minutes and do it in about five.
This is the whole path: create an account, choose what kind of business you want, choose where, look at the results, cut them down, pick your rows, export, and open the file. Ten steps. Nothing here assumes you have used a tool like this before.
Two things are worth knowing before you start, because they explain almost everything else:
- Searching is free. You can search, filter and count as much as you like without spending anything. Only exporting costs credits.
- Nothing is scraped while you wait. The businesses are already in our index. A search is a database query, which is why it comes back in about a second.
Create your account
Go to the sign-up page and fill in your details. Your trial is 14 days and 100 leads, with no credit card.
There is no card field, nothing is authorised or held, and the trial does not turn into a paid plan. On day 14 it simply stops. Every feature is unlocked in the meantime, country-wide search included — why we do not ask for a card.
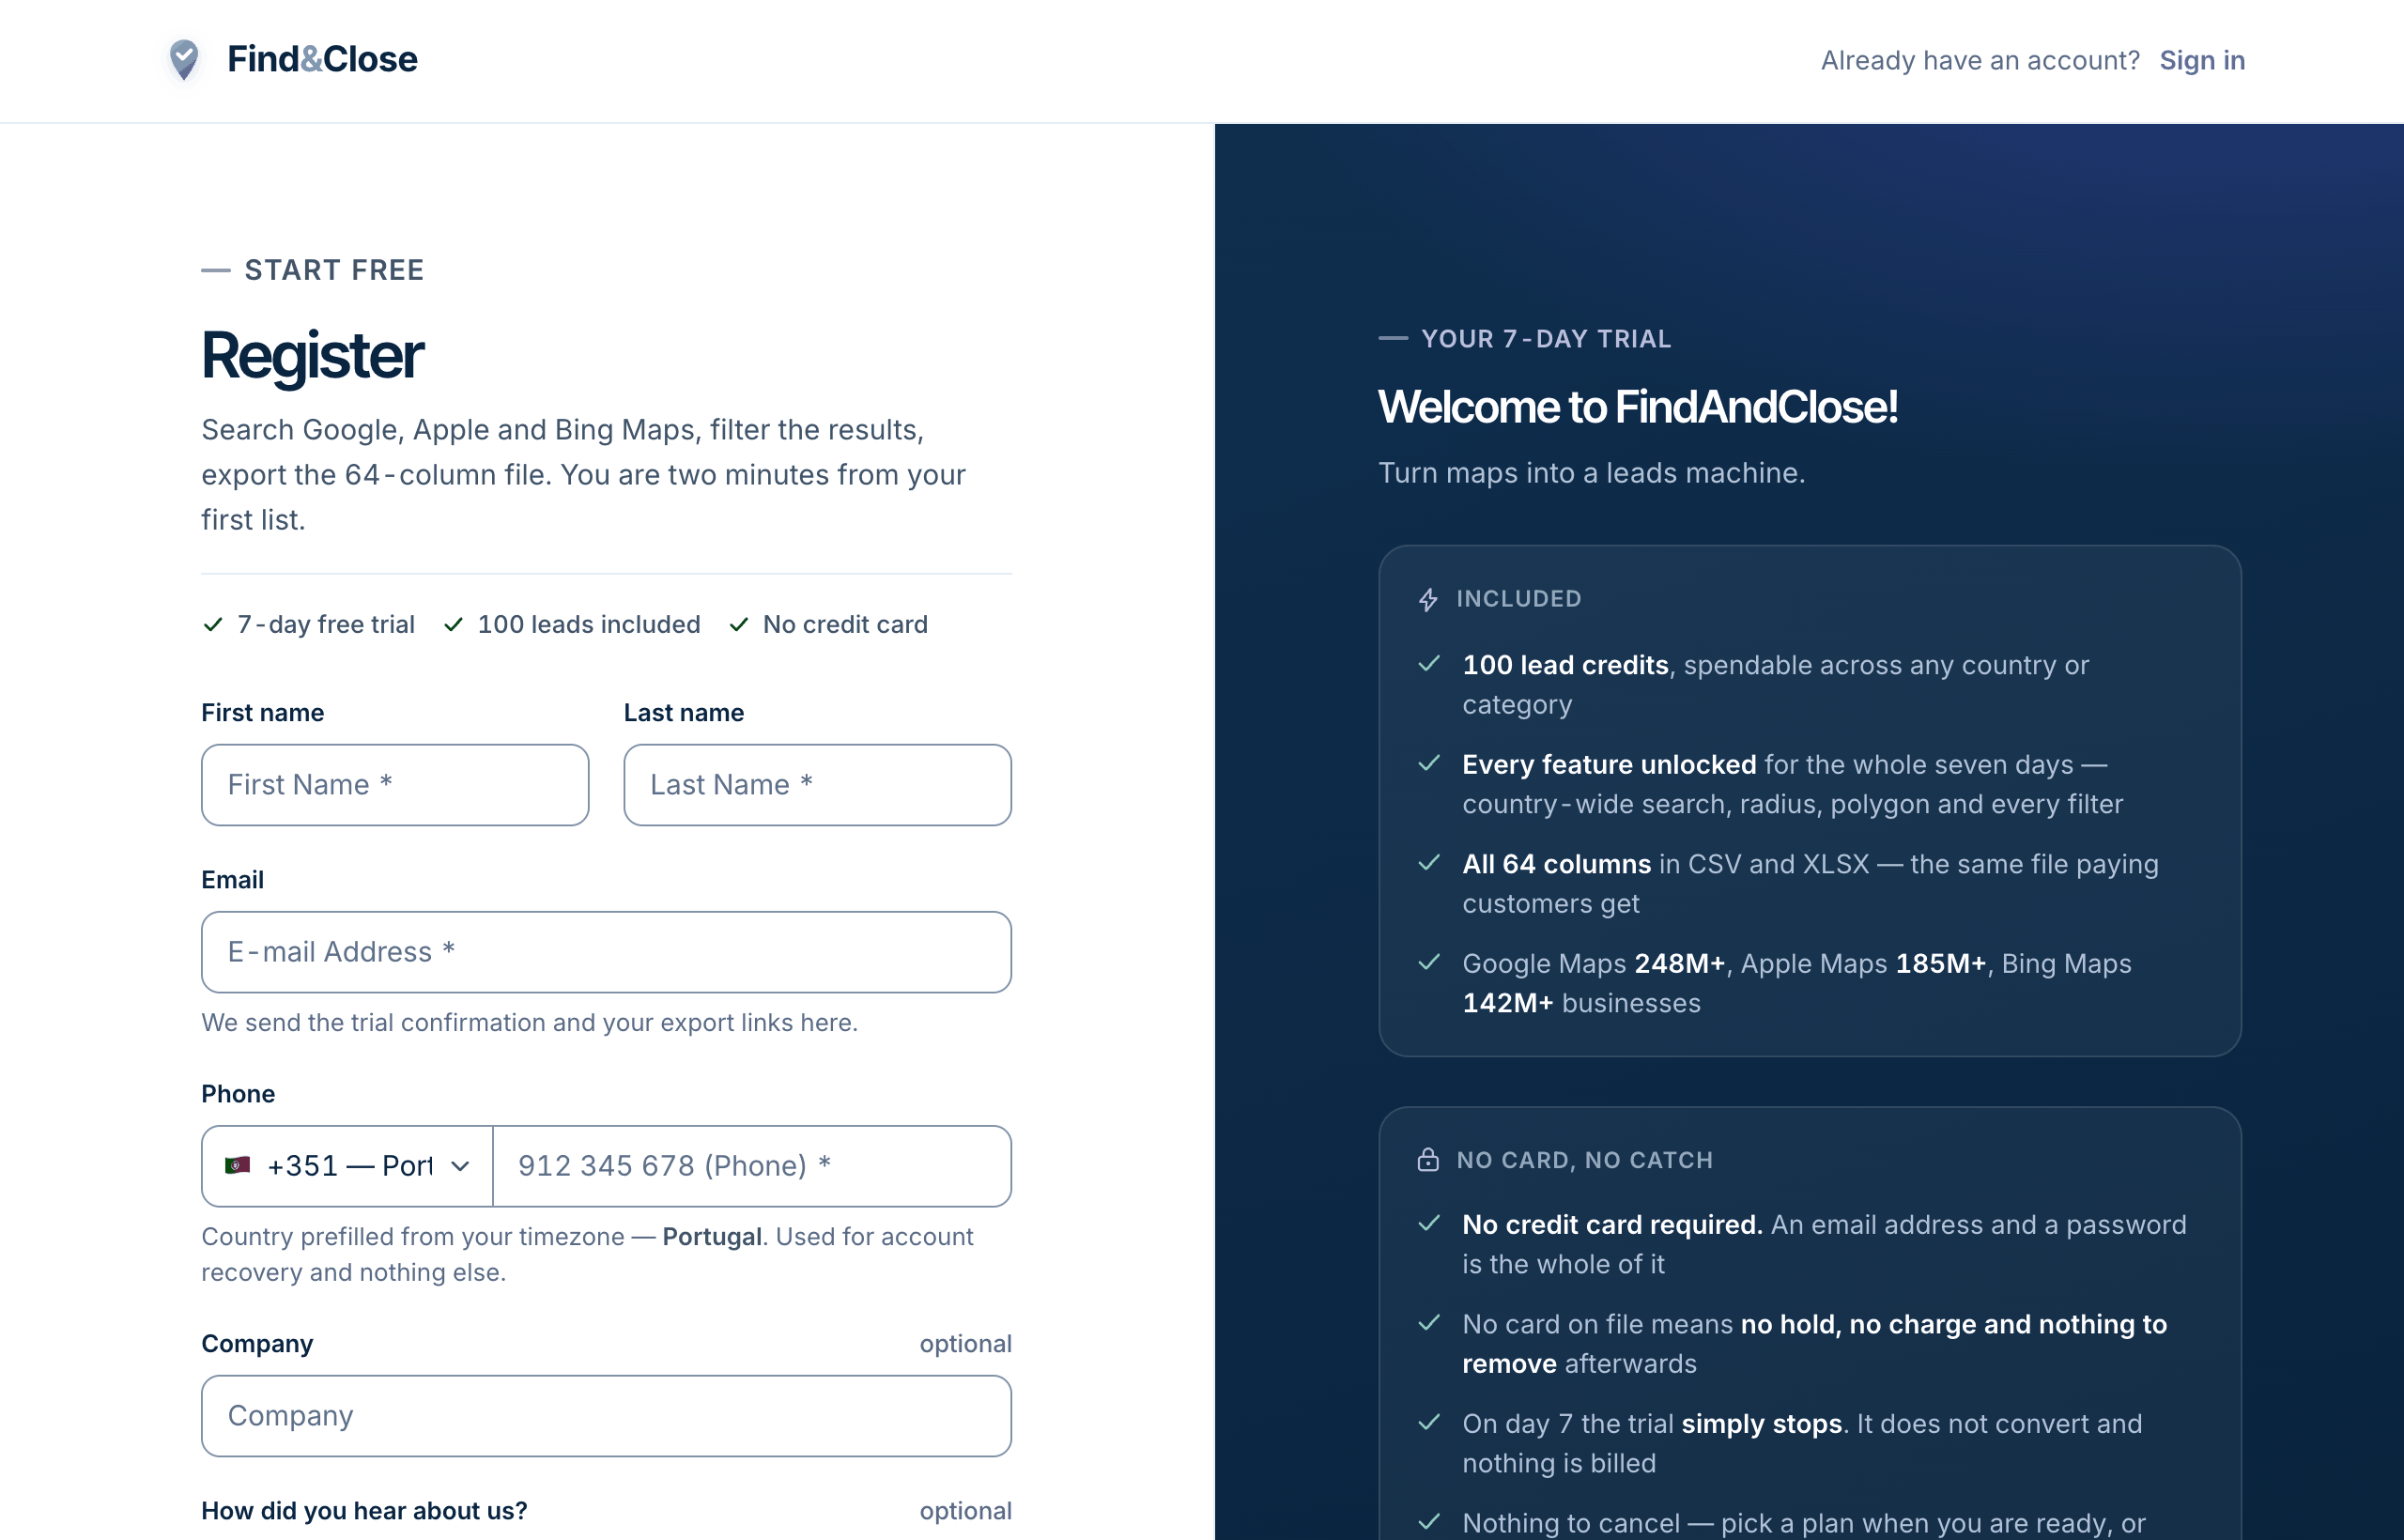
Nothing to diarise and nothing to cancel
The trial lapses rather than converting, so there is no date you have to beat and no button you have to remember to press. There is nothing to cancel.
One credit is one business, exported once. A hundred of them is a real sample: enough to check twenty businesses you already know, then send a genuine first campaign to fifty. How to spend them well.
Choose your activities
Once you are in, you land on the Search screen. The first field is Activities — this is what kind of business you want.
Start typing and matches appear, each with the number of businesses we hold in that category. Click one and it becomes a small chip in the field. You can add several chips, and the search returns businesses matching any of them.
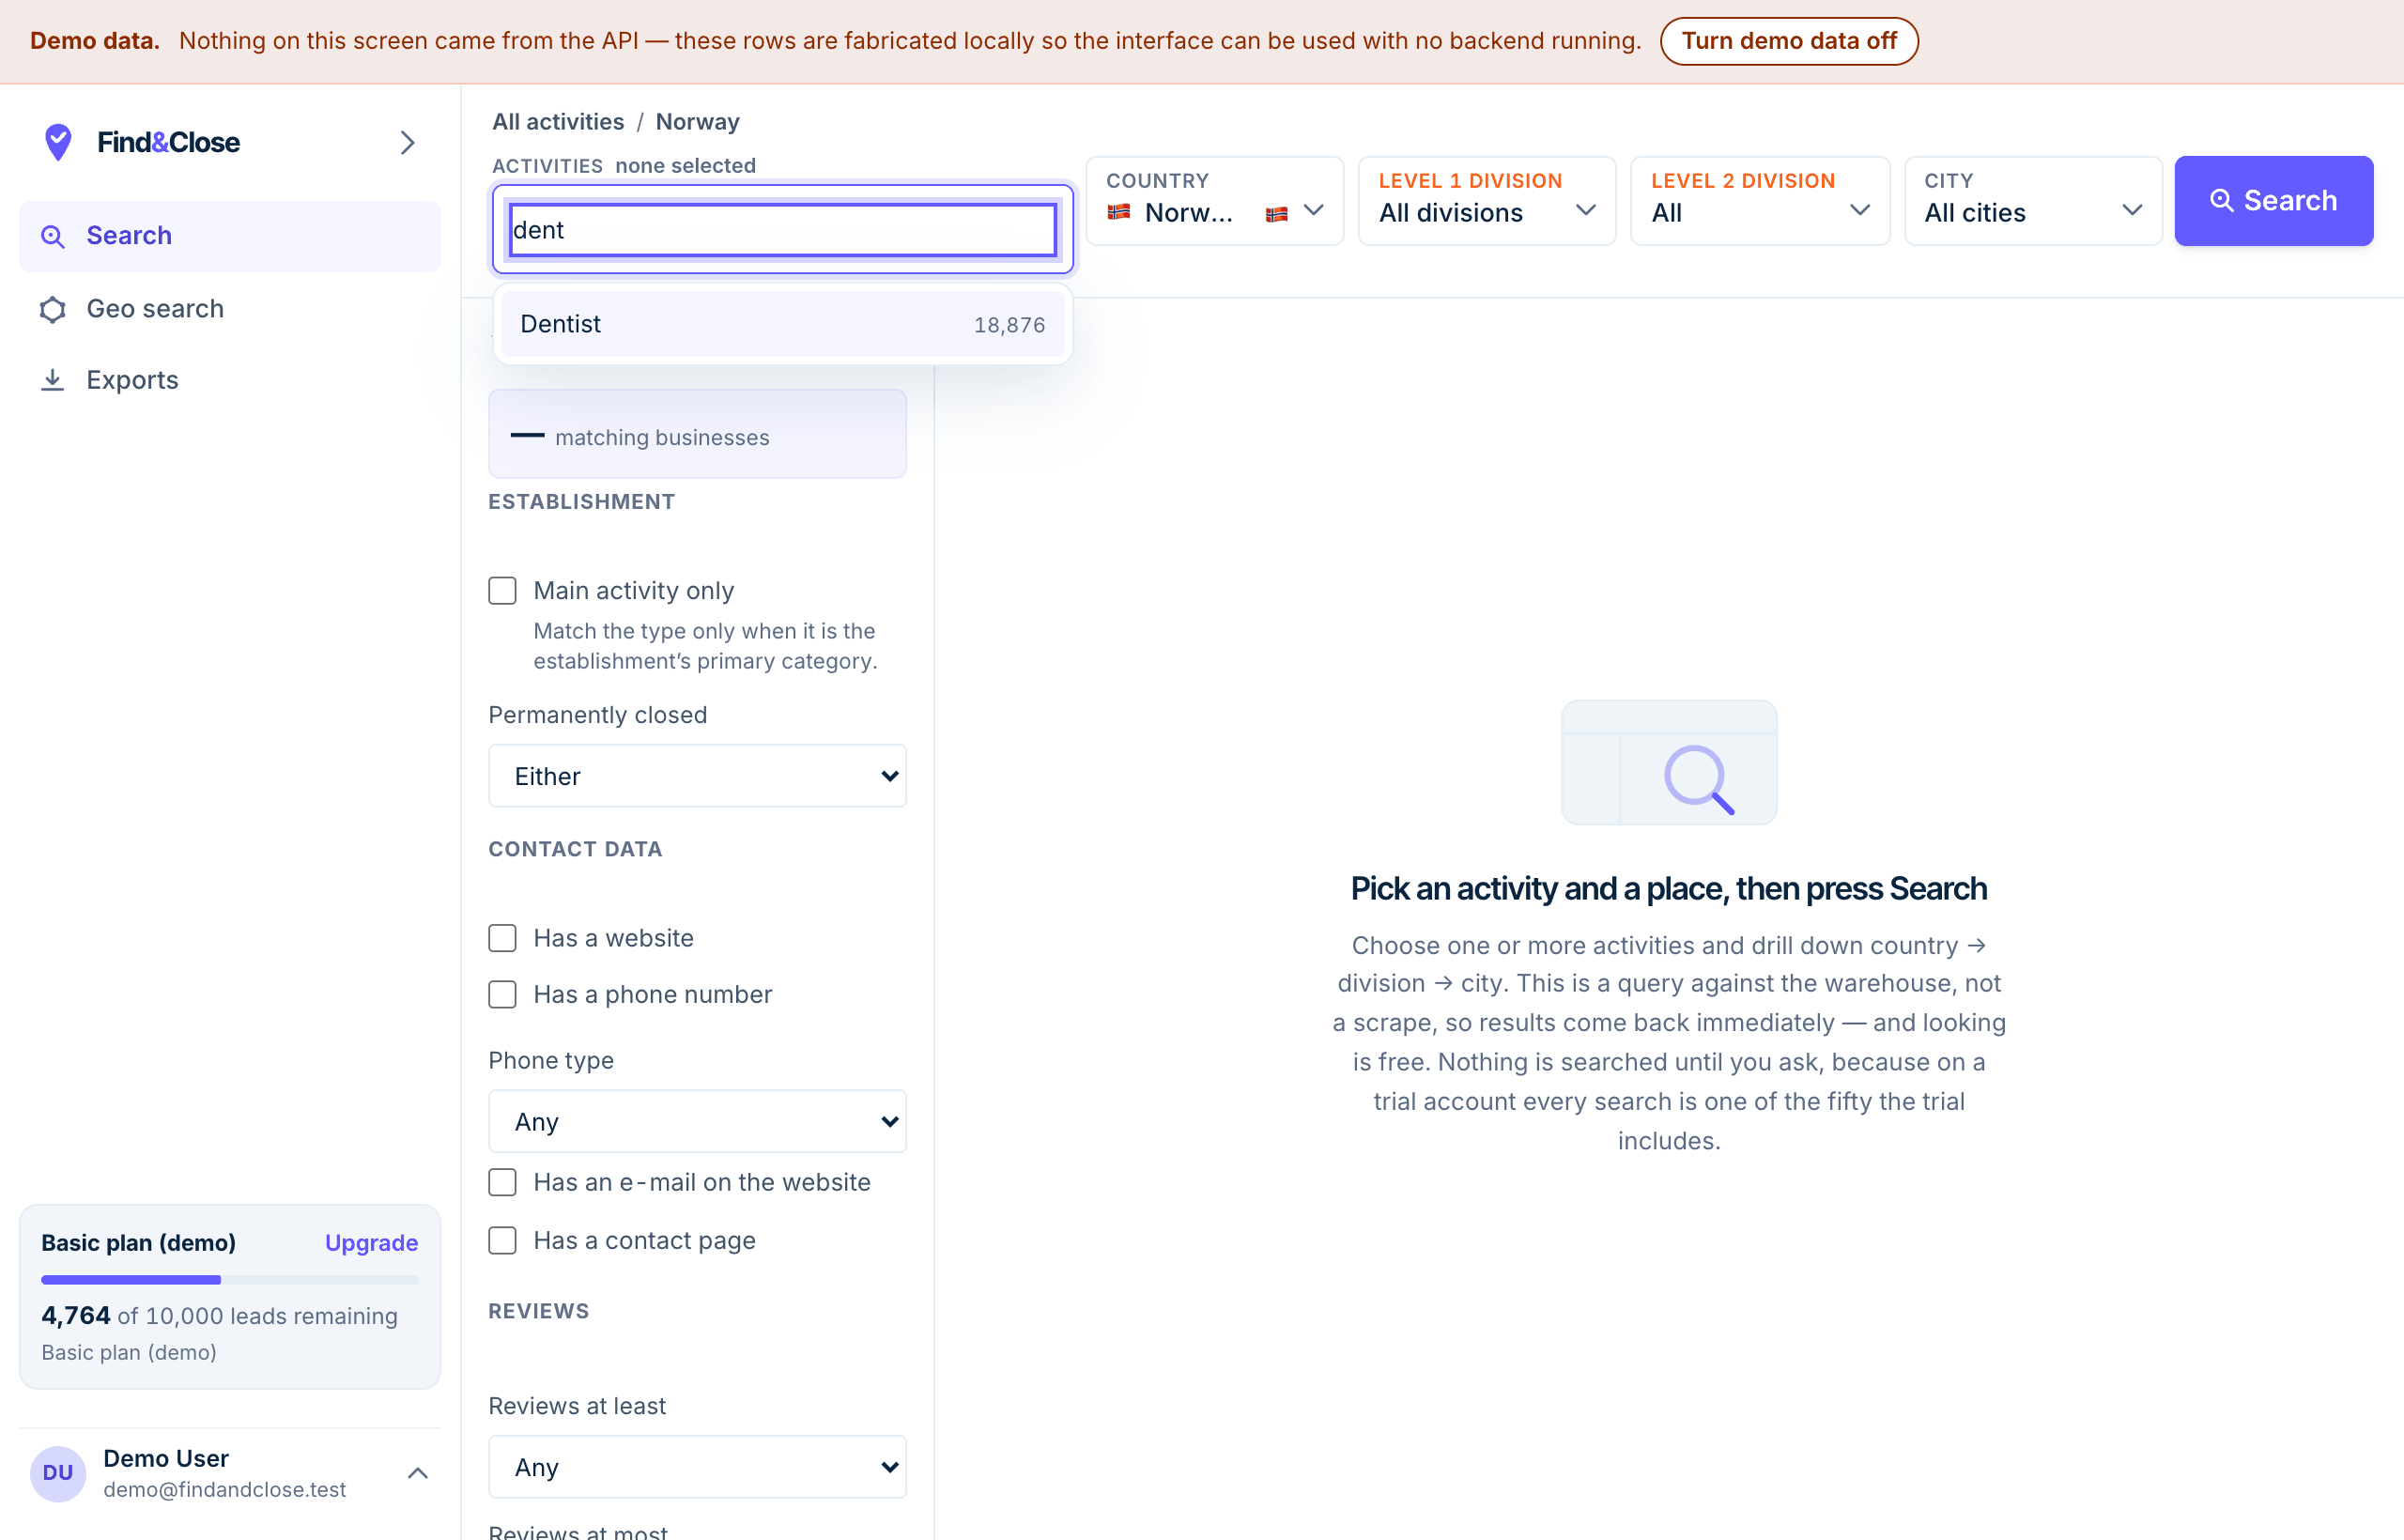
- 1Type a word here. You do not have to know the exact category name.
- 2Each suggestion shows how many businesses are in that category. Use that number — it tells you the size of the market before you spend anything.
Categories come from the maps themselves, not from us, so they can be oddly specific — "Fine dining restaurant", "Seafood restaurant" and "Fish & chips restaurant" are three different categories. Start broader than feels right and cut the list down later with filters; that is free, and it is how you avoid missing businesses that describe themselves slightly differently.
A worked example
Selling scheduling software to clinics? Do not use one chip for "Clinic". Add Dentist, Dental clinic, Orthodontist, Physiotherapist and Chiropractor — five chips, one search, one export.
Choose where to look
To the right of Activities are four dropdowns. They narrow from the outside in: Country → a first-level division → a second-level division → City.

You can stop at any level, on any plan. Leave every box below Country at "All" and the search covers that whole country; pick a level 1 division and it covers every city inside it. Nothing here is sold a rung at a time — pay for volume, never for access — and that includes the trial.
A level 2 division is a county in the United States or a department in France; a level 1 division is a state or a région. One search at level 2 covers every city inside it, which saves your time rather than your credits: an export is billed per business either way.
The city box searches as you type, so three letters is usually enough. Cities are ordered by how many businesses we hold in them, so the one you meant is normally first.
Run the search and read the results
Press Search. Results come back in about a second, because nothing is being scraped — the businesses are already in the index.
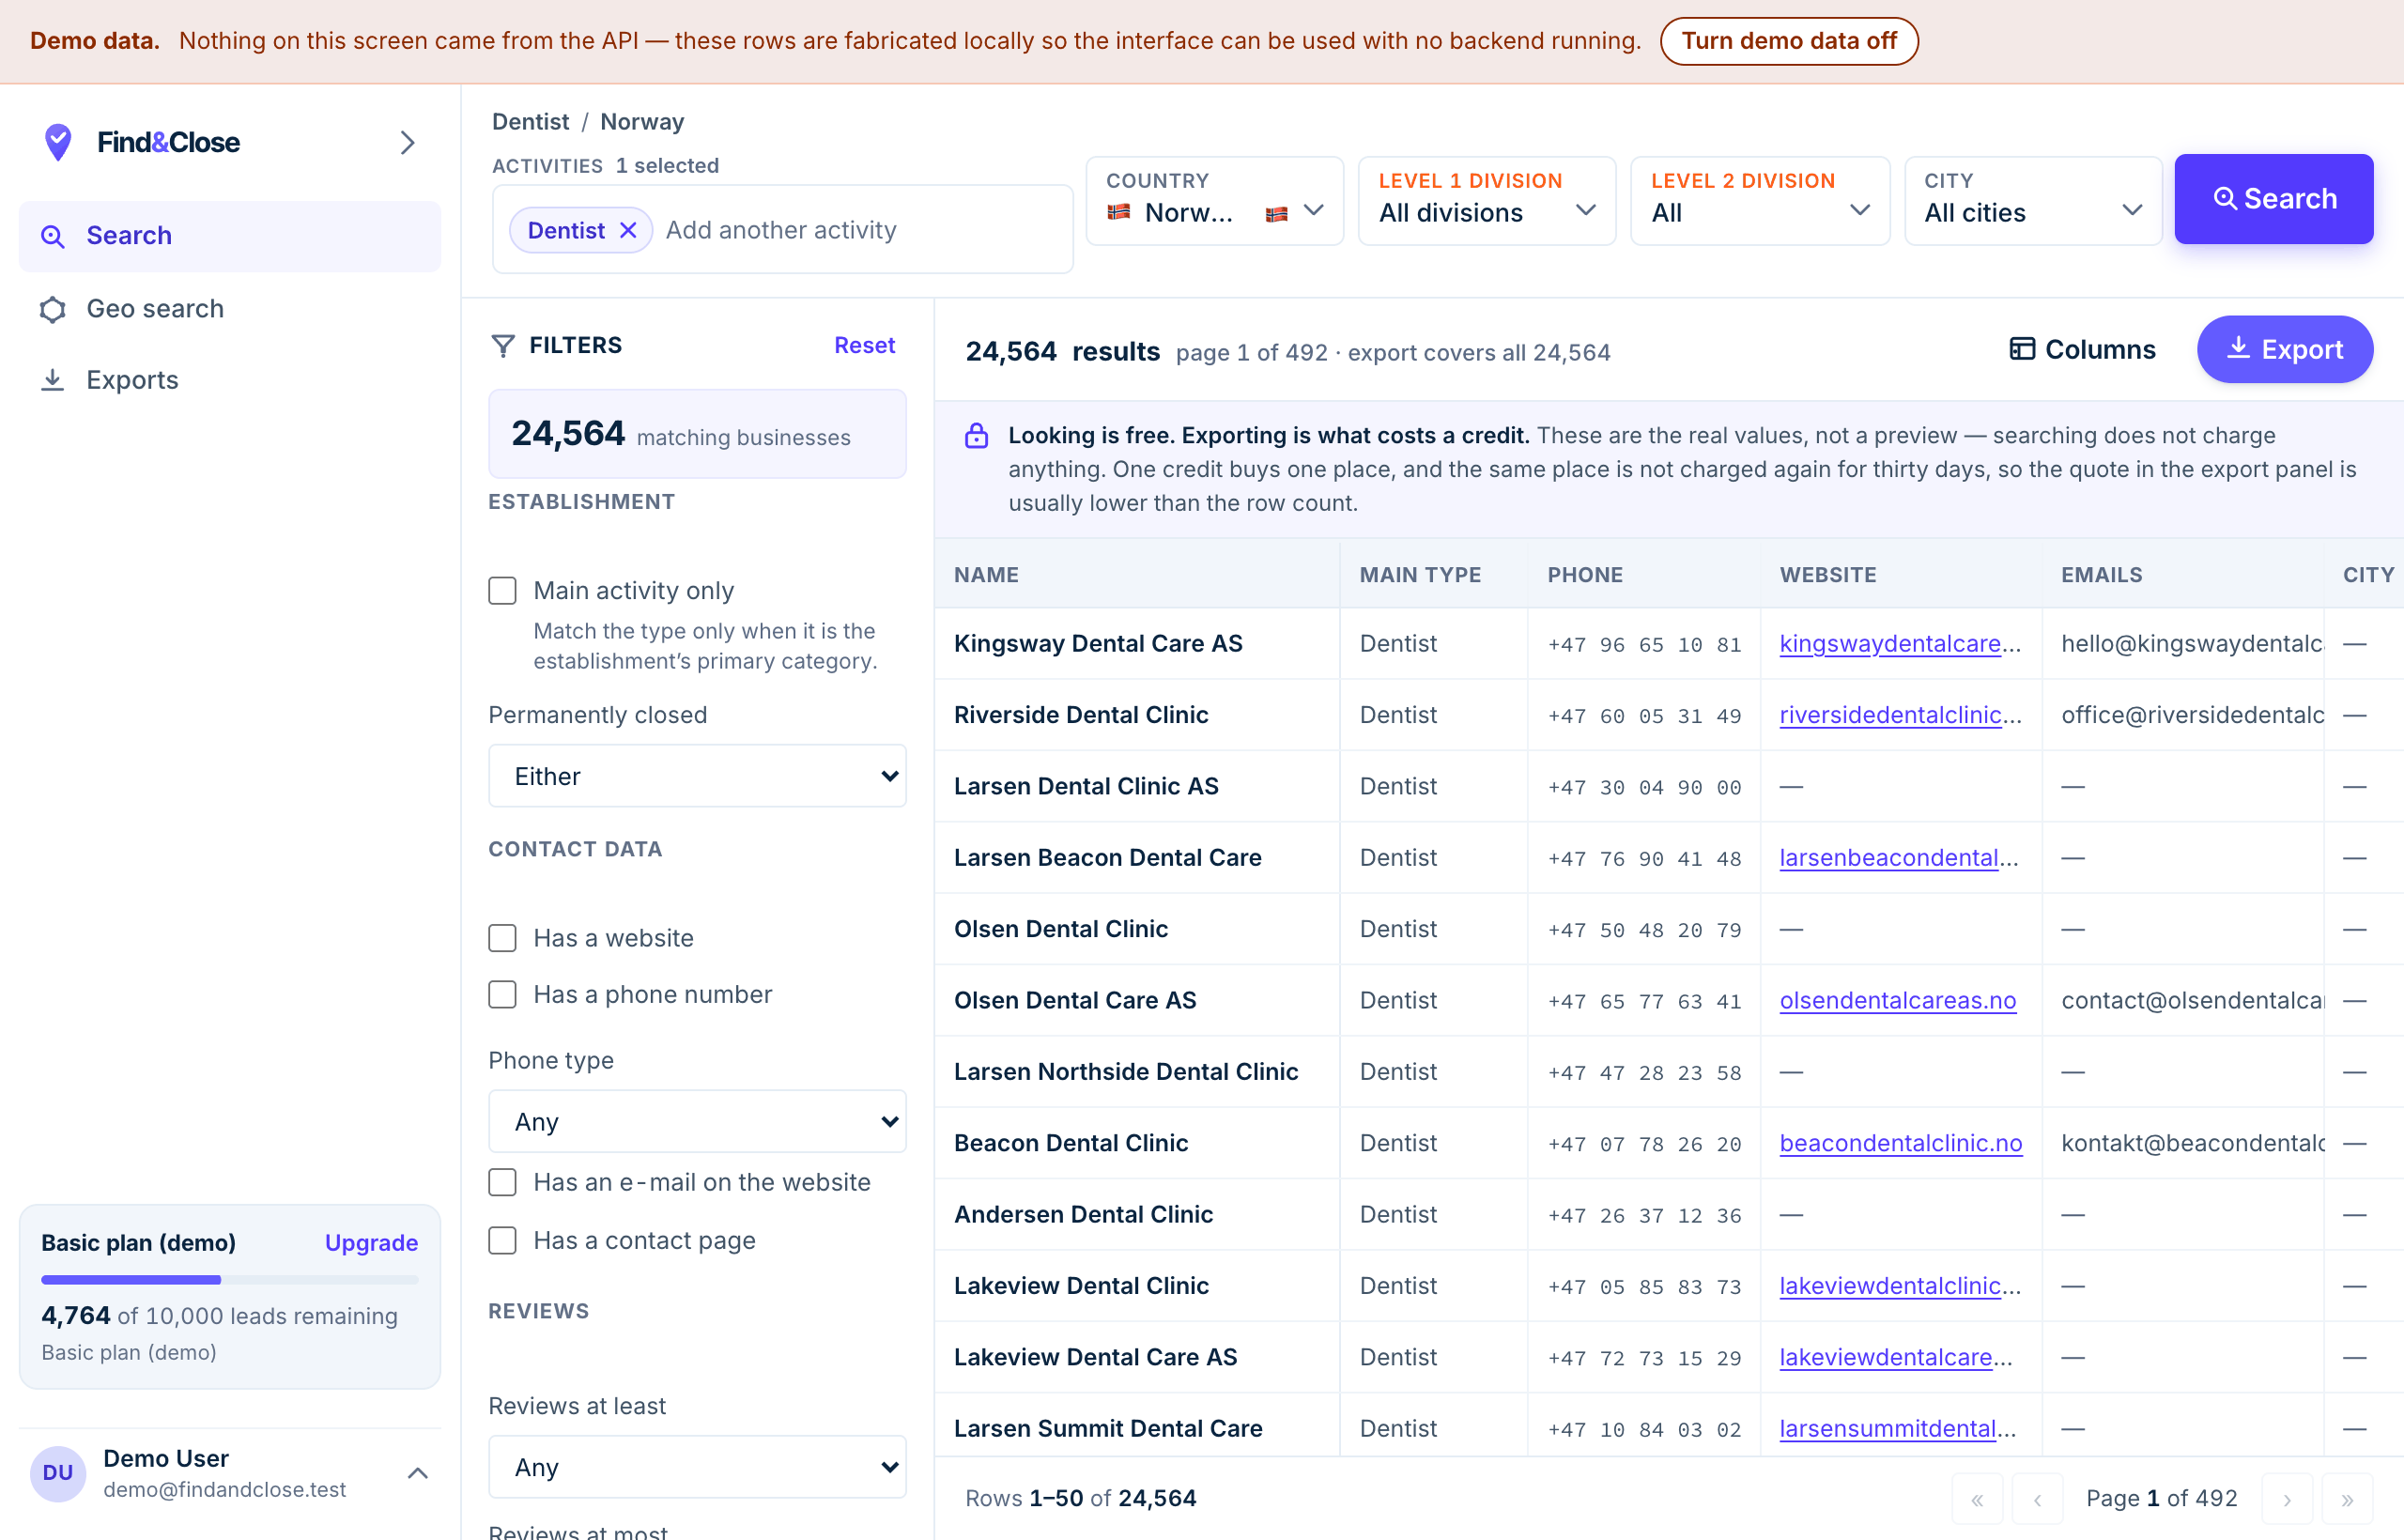
- 1The number of businesses that match. This is the real count across every page, not the number on screen — and it is what an export of everything would cost in credits.
- 2The same figure in the filters panel. It updates the moment you change a filter, so you can watch a filter halve your list.
- 3Export. Nothing is charged until you press this and confirm.
Each row is one business. The table shows a readable subset and the Columns control opens the rest; the export writes all 64 — name, types, address, phone, website, emails, reviews, socials, working hours and the website-derived fields. Every column is explained here.
The count is the price
If the count says 28,566 and you export all of it, that is up to 28,566 credits. Get the count down to a number you are happy to pay for before you export. Changing the search costs nothing.
Why the emails and phones are hidden
Scroll the table sideways to the contact columns and you will see something like
f***@ster•••••••• instead of a real address. This is the thing new users ask
about most, so here is the plain answer.
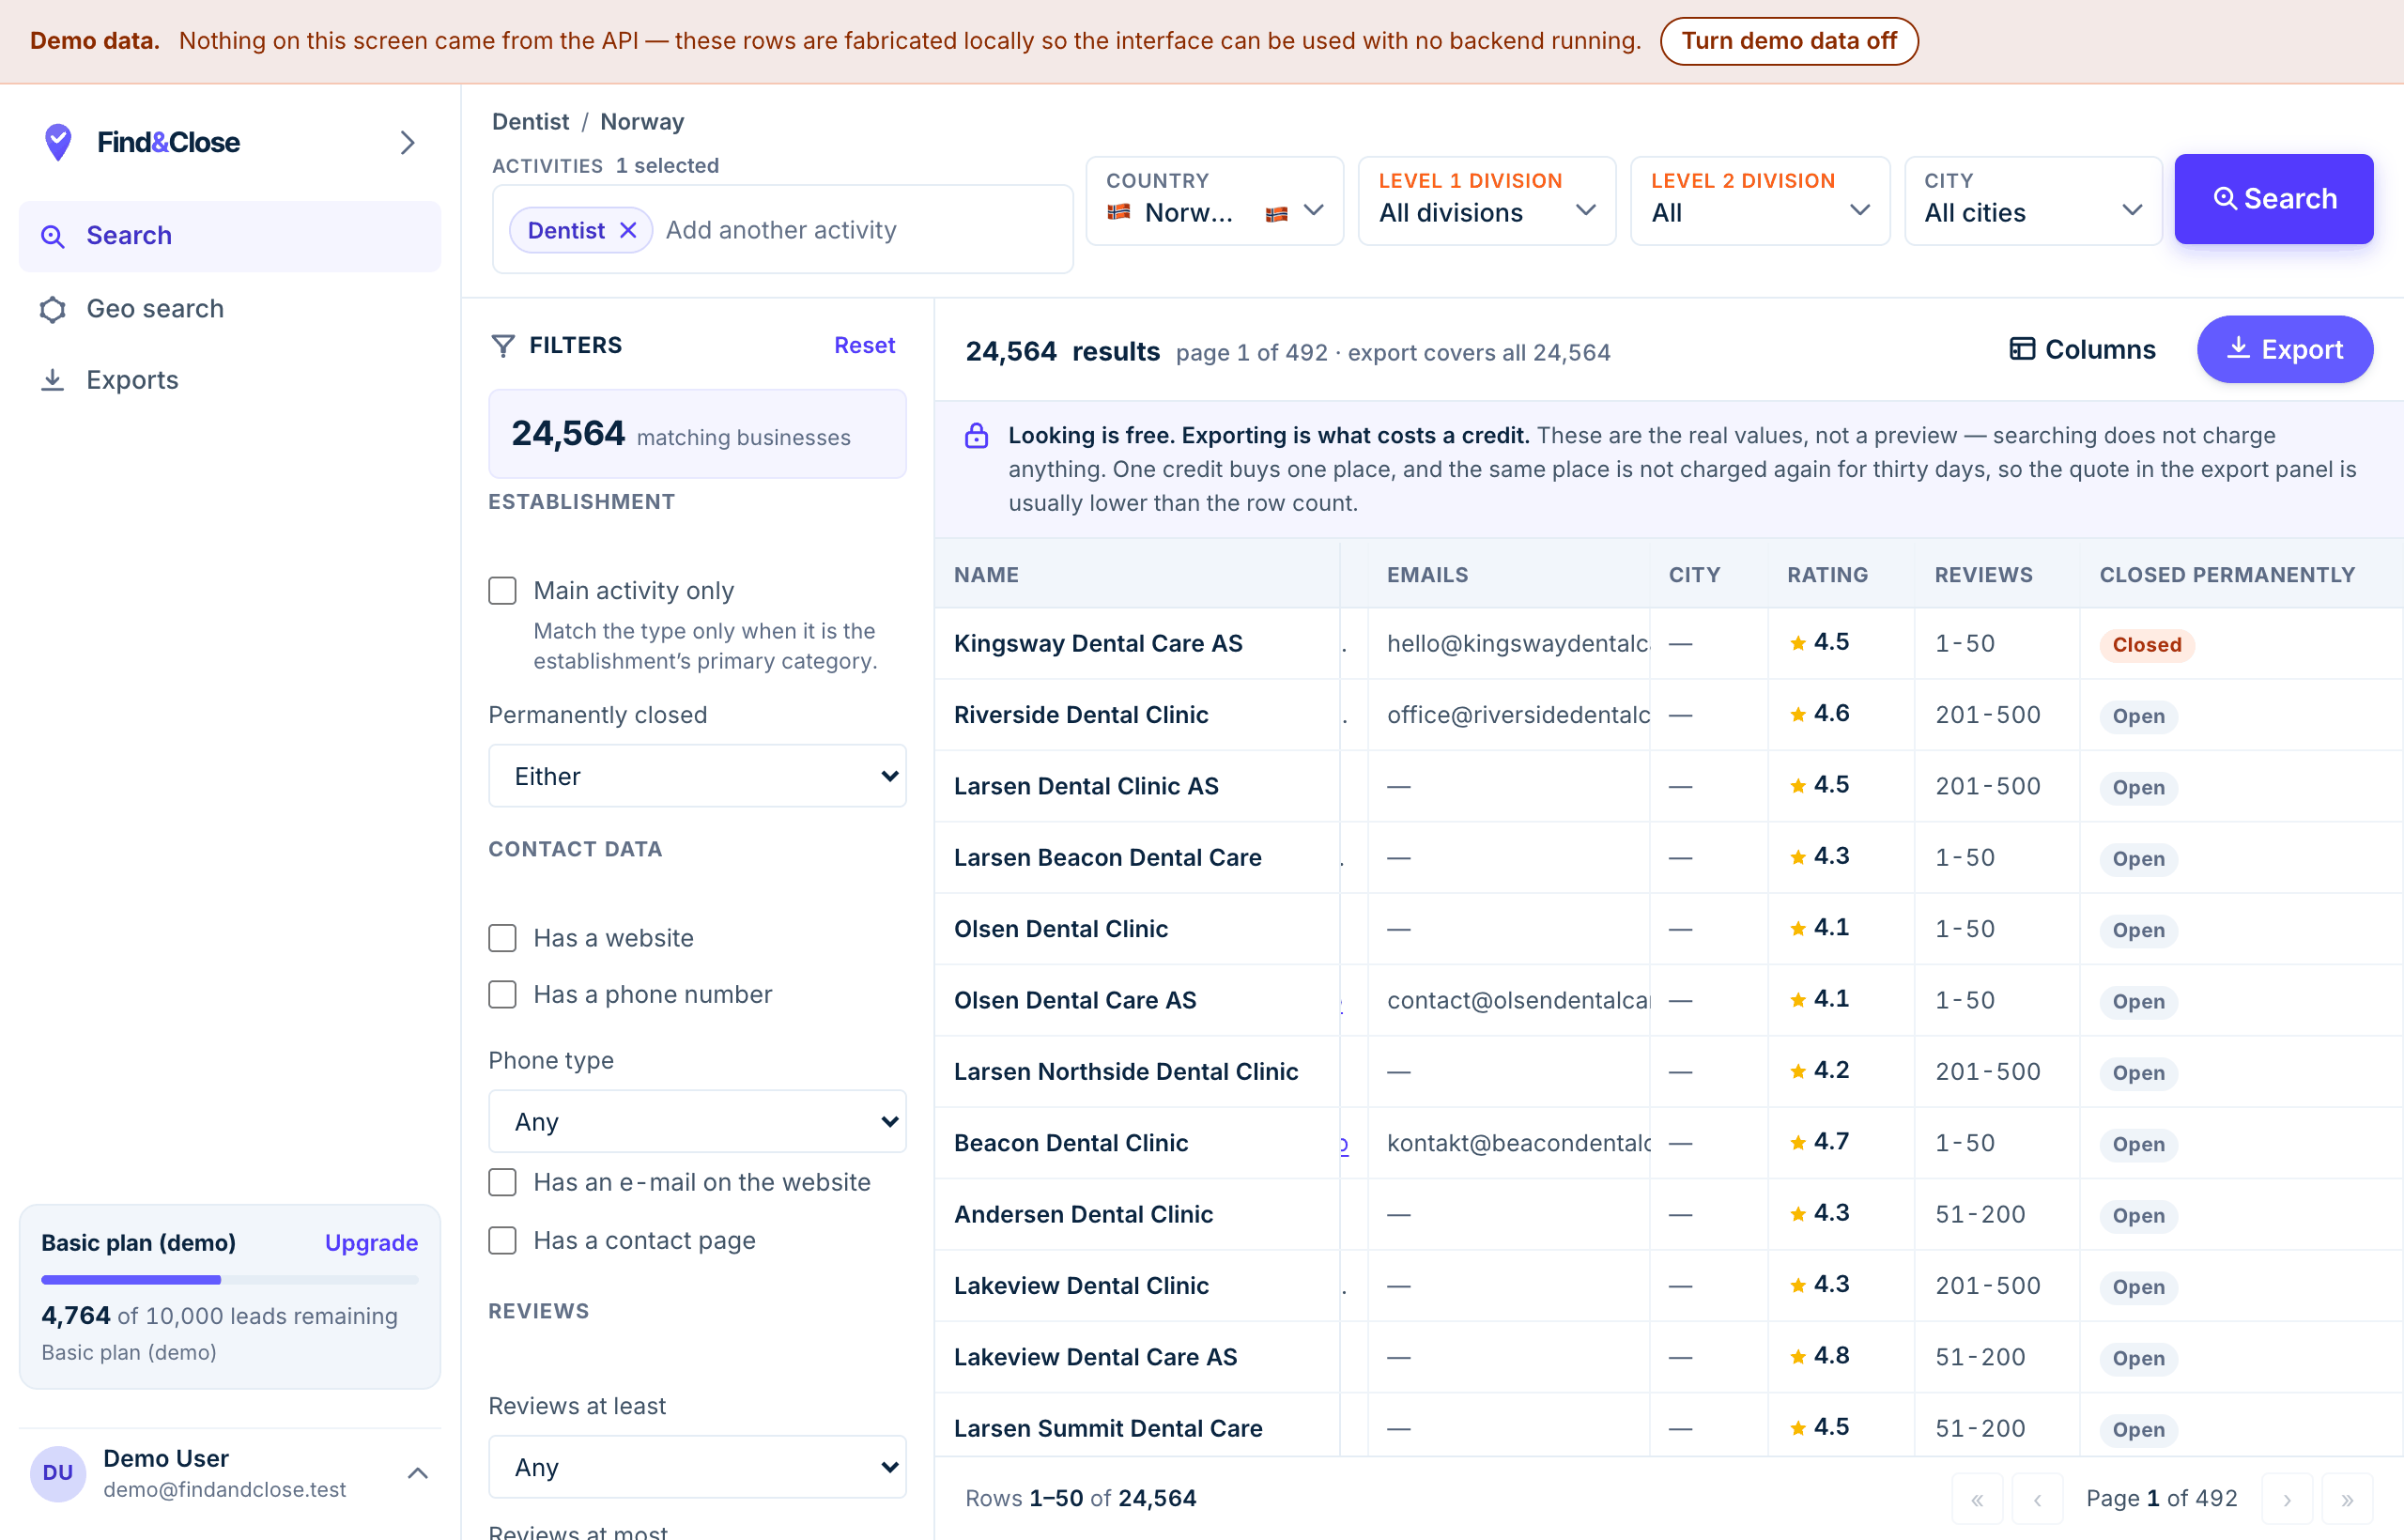
- 1Masked email addresses. The first character, the shape of the domain and the fact that an address exists are all visible. The rest is not.
Contact details are hidden until you export. They are not hidden to annoy you — hiding them is what lets searching be free and unlimited. Because a preview cannot leak a contact, we never have to ration previews.
The mask still tells you a lot:
f***@ster••••••••— there is an email, it is on the business's own domain rather than a free provider, and it starts withf.+47 **5 ** 3**— there is a number, it is Norwegian, and the app tells you separately whether it is a mobile or a landline.- An empty cell is genuinely empty. We never mask an absence. If there is no email, the cell is blank — and here is why that happens.
The app says the same thing above the table, so you do not have to remember it:

Do not squint at masks
To find the businesses that have an email, use the Has email filter in the next step. It works on the real values, so the count it gives you is exact.
More: why previews are masked.
Cut the list down with filters
The panel on the left holds the filters, grouped by what they test. They are free, they apply instantly, and they are the main way to stop paying for rows you would never contact.
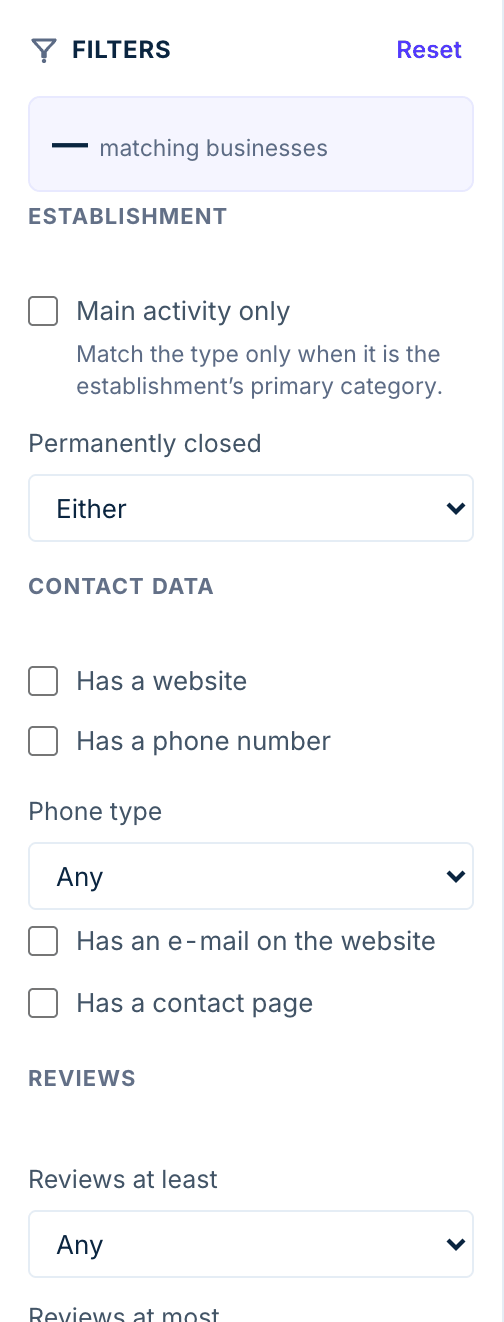
- 1The live count. Watch this number as you tick things — the moment it halves, you have learned something real about your market.
- 2The filters that matter most on a first search: Has a website and Has an e-mail on the website.
A good order for a first search:
- Has an e-mail on the website (or Has a phone number, if you are calling). This is the biggest single cut and the one that most changes what you pay for.
- Reviews at least — the
1-50band is a sensible floor. It is a decent proxy for "this business is actually trading". The review filter works in bands, not exact numbers, because that is how the data is published. - Minimum rating — only if your offer depends on it. A maximum is useful too: if you sell reputation management, 3.0–4.0 is a better list than 4.5+.
Closed businesses are excluded already, so you will not be billed for somewhere that shut last year. More: the lead filters, and when to use each.
Or draw the area yourself
Administrative boundaries are drawn for government, not for sales territories. If the area you care about is "twenty minutes from my office" or "this side of the river", use Geo search in the left-hand menu instead of the four dropdowns.
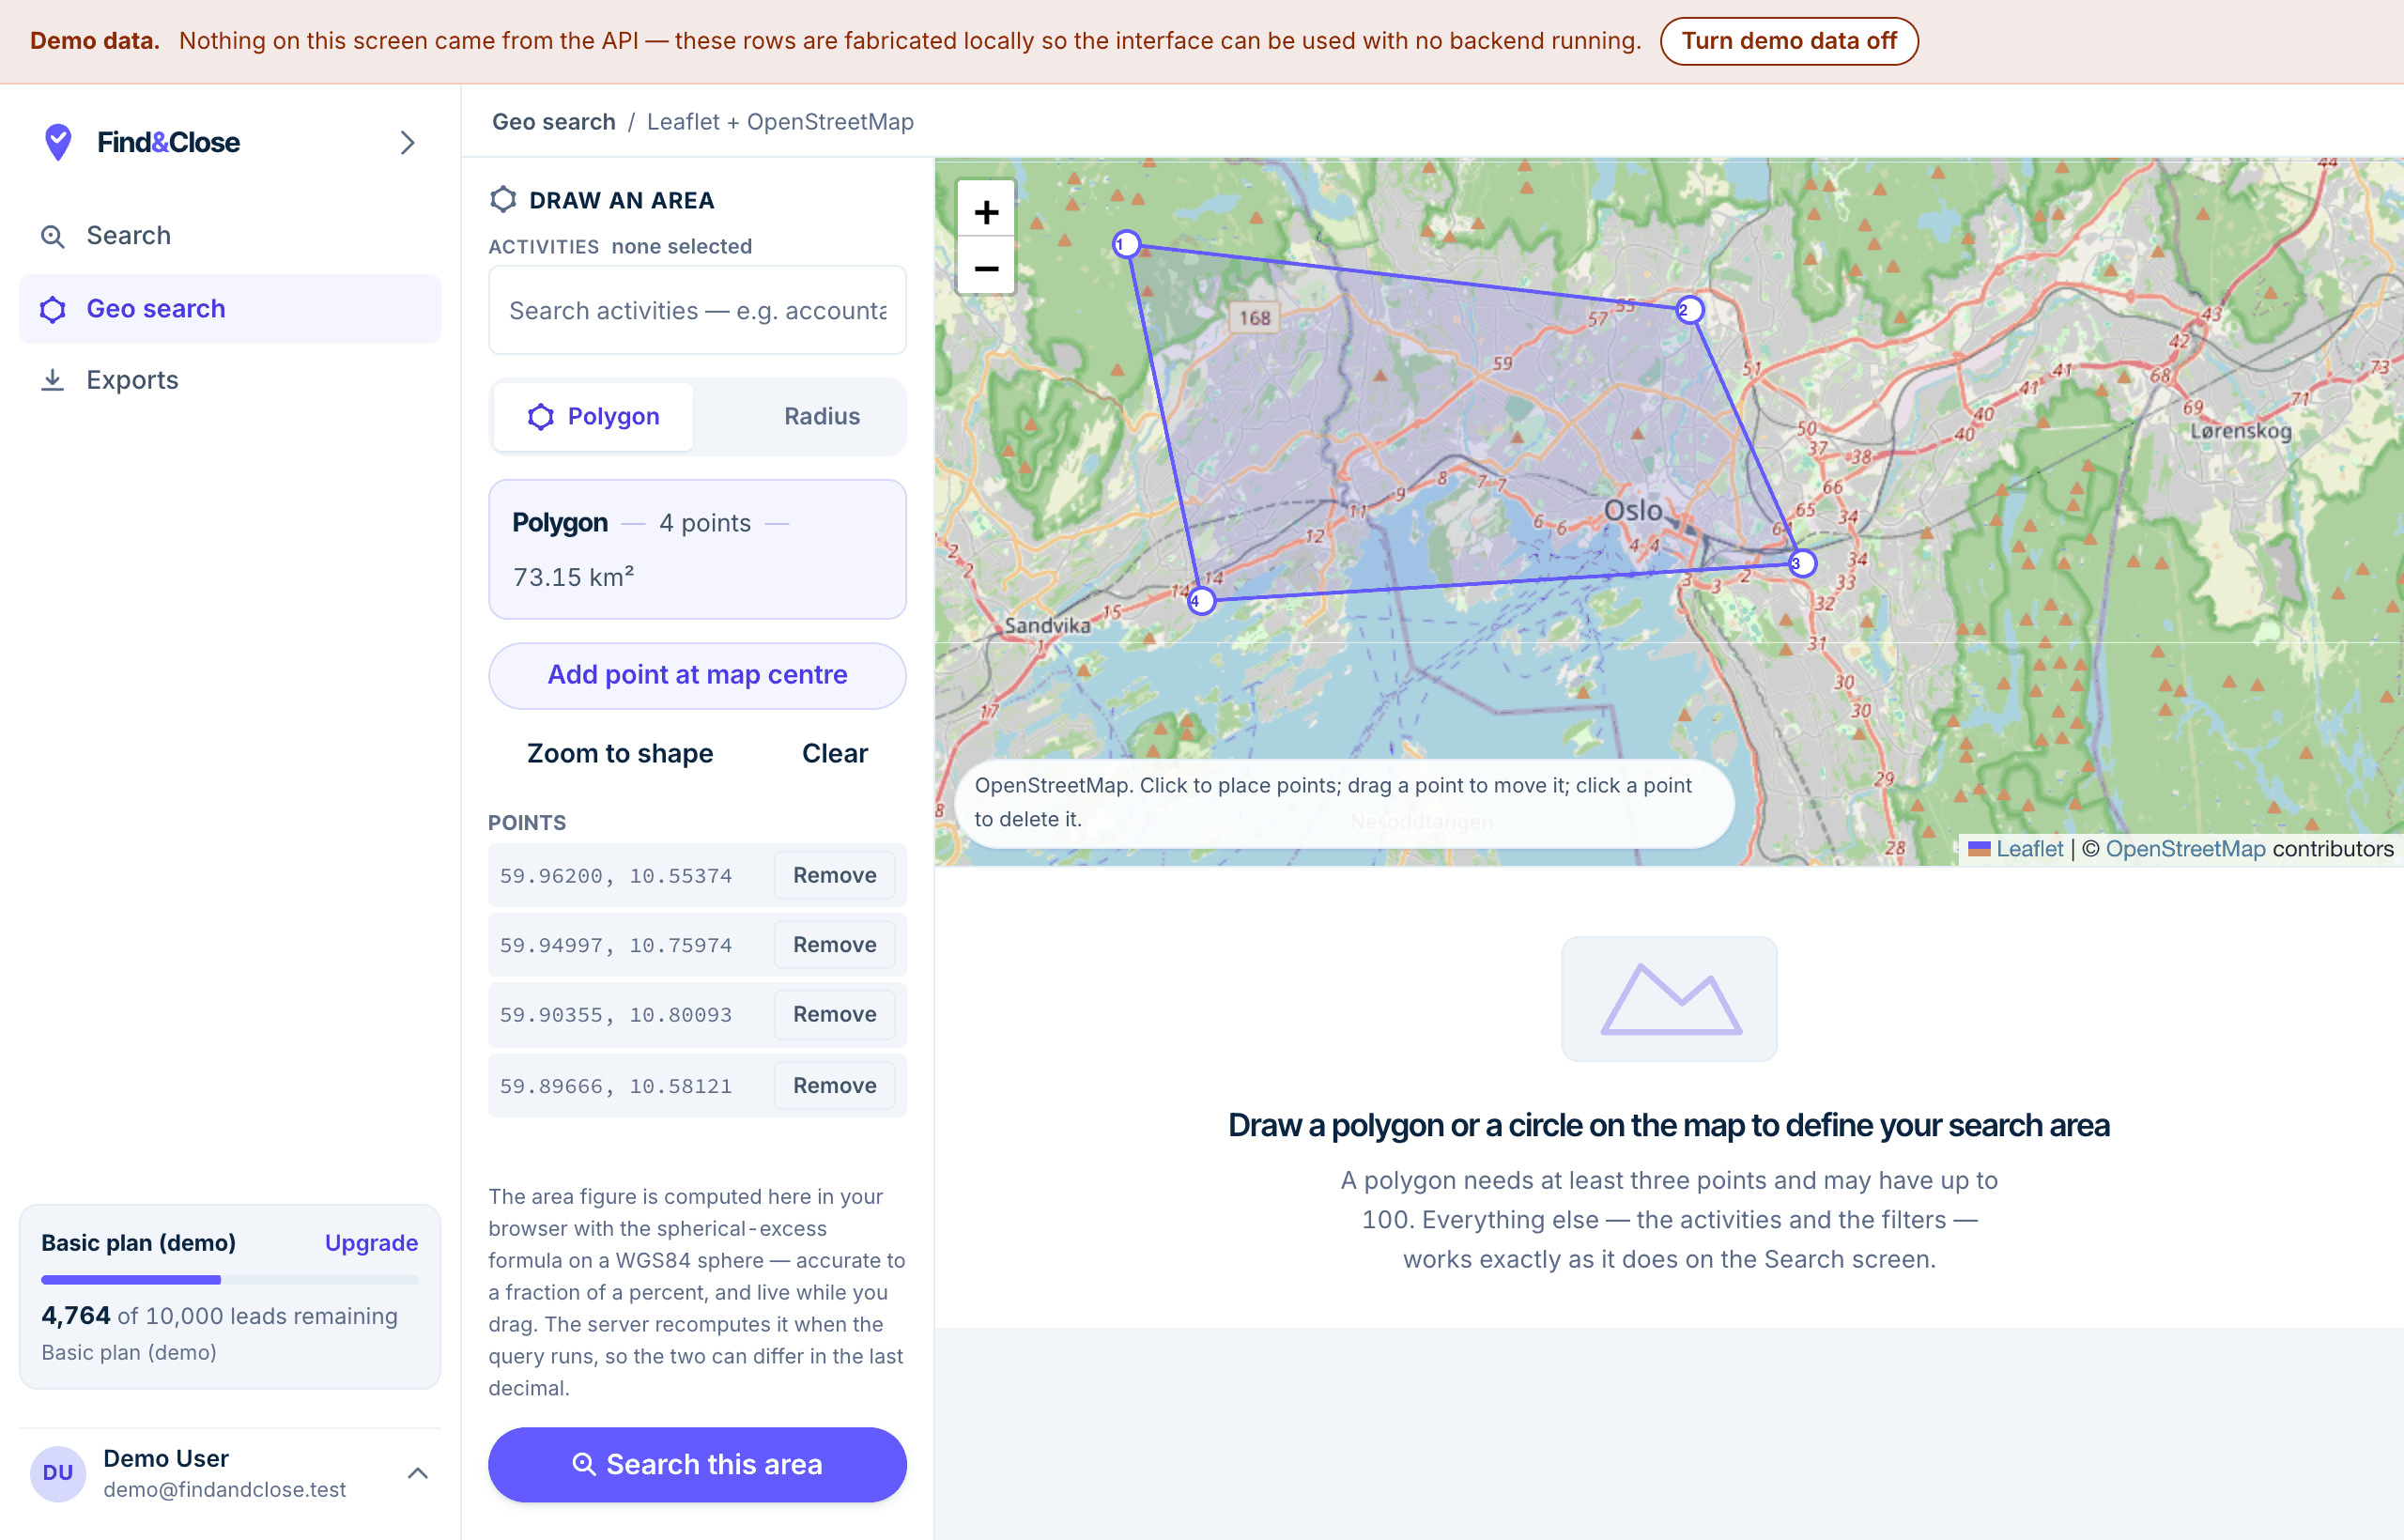
- 1Two modes. Polygon lets you click a shape; Radius drops a pin and a distance.
- 2The area updates as you draw. Here, four clicks around Oslo make a 73 km² catchment.
Polygon — click the map to place points and the outline closes itself. Drag a point to move it, click a point to delete it. Three points minimum, a hundred maximum. Use it when the area has a real shape.
Radius — drop a pin and set a distance. Use it when the constraint is travel time from a fixed point.
Both modes are on every plan, at any size
Radius and polygon are not tiered, not capped and not held back during the trial. Draw a shape the size of a continent if that is your territory. Geography is not what you pay for here — the full article is here.
Drawing replaces the location dropdowns for that search; activities and filters work exactly the same. Draw a little wider than you think and trim with filters — a shape that hugs too tightly drops businesses whose map pin sits at the back of a building.
How many rows you are about to buy
There is no row picker, and that is deliberate. An export takes every row your search and filters match — you cannot export "just these ten", and you cannot accidentally export ten thousand when you meant fifty either.
So the count above the results table is the price. Get it to a number you are happy to pay for before you press Export, using the filters in the previous step. The export panel repeats the figure in a full sentence before you confirm, so there are two chances to notice.
Narrow the search, not the selection
Turning on Has email is usually the biggest single cut, and it removes exactly the rows you would never have contacted. More on why the export equals the search.
Export
Press Export. A panel opens that names the export, lets you pick which file you want handed to you first, and lets you trim the columns.
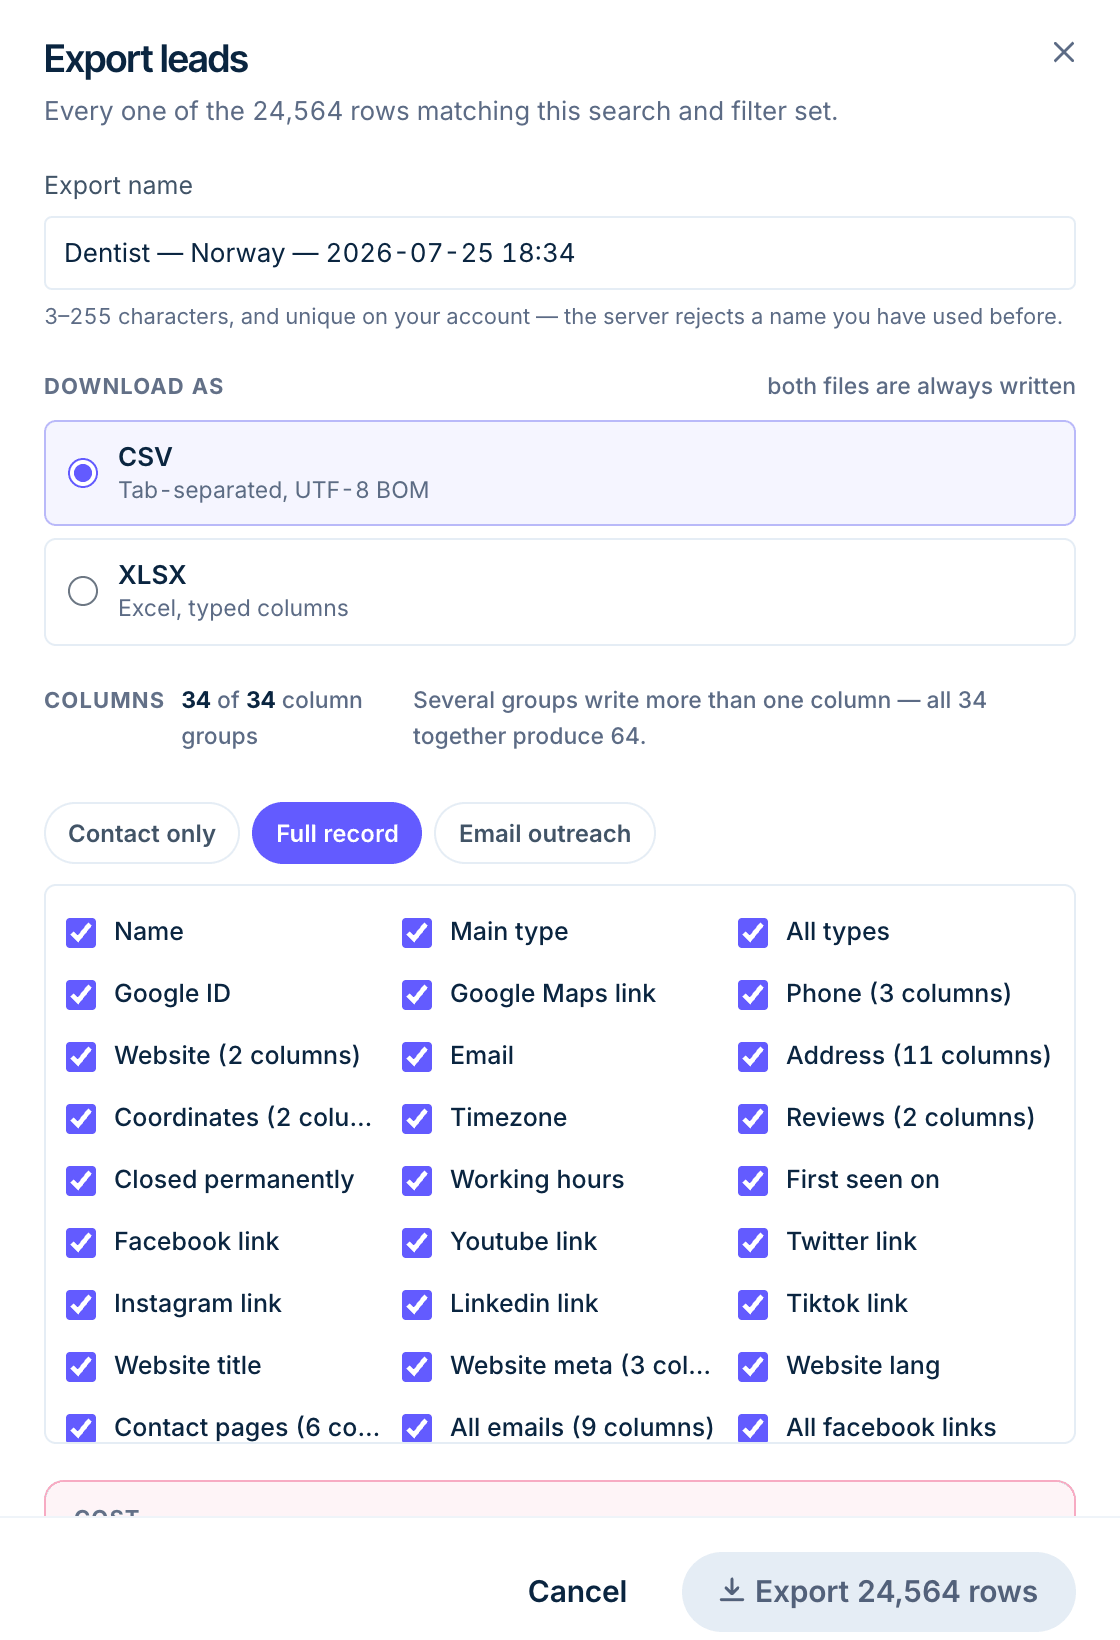
- 1Every format your plan writes is always generated. This choice is only which one the button hands you first — you can come back for the others.
- 234 column groups, not 34 columns: eight of them write more than one — Address alone writes eleven — and all thirty-four together produce the full 64.
Before you confirm, the panel shows you exactly what it will cost and what your balance will be afterwards:
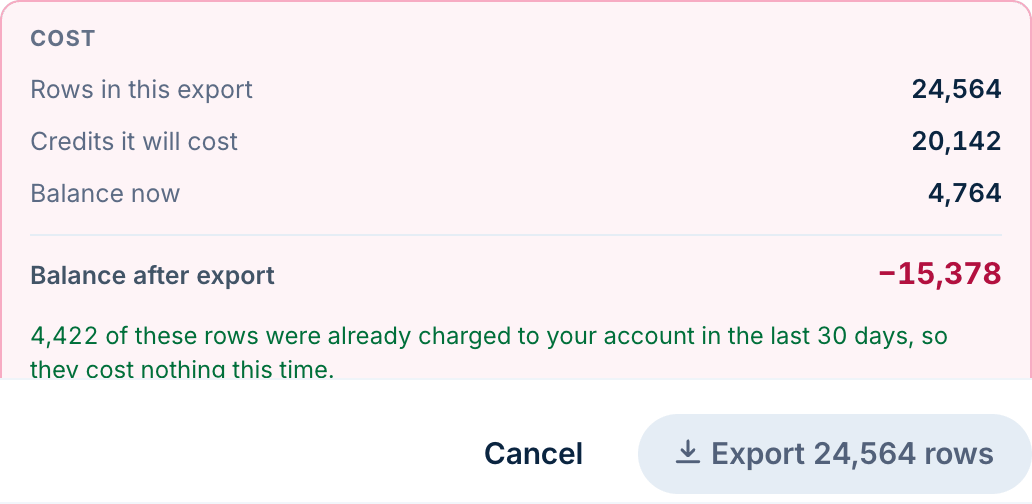
- 1A negative balance after export means the selection is bigger than your allowance. The export is blocked rather than billed — reduce the selection or upgrade.
Three things worth knowing about the price:
- One credit is one business, not one field. A row with all 64 columns filled and a row with only a name cost the same, so exporting fewer columns does not save money.
- A business is billed once per 30 days. Run two overlapping searches and you are not charged twice for the practices in both.
- Re-downloading is always free.
More: formats and columns · how credits work
Wait for the file — you can close the tab
The export runs on our servers, not in your browser. Close the tab, shut the laptop, go home. Everything lands on the Exports screen.
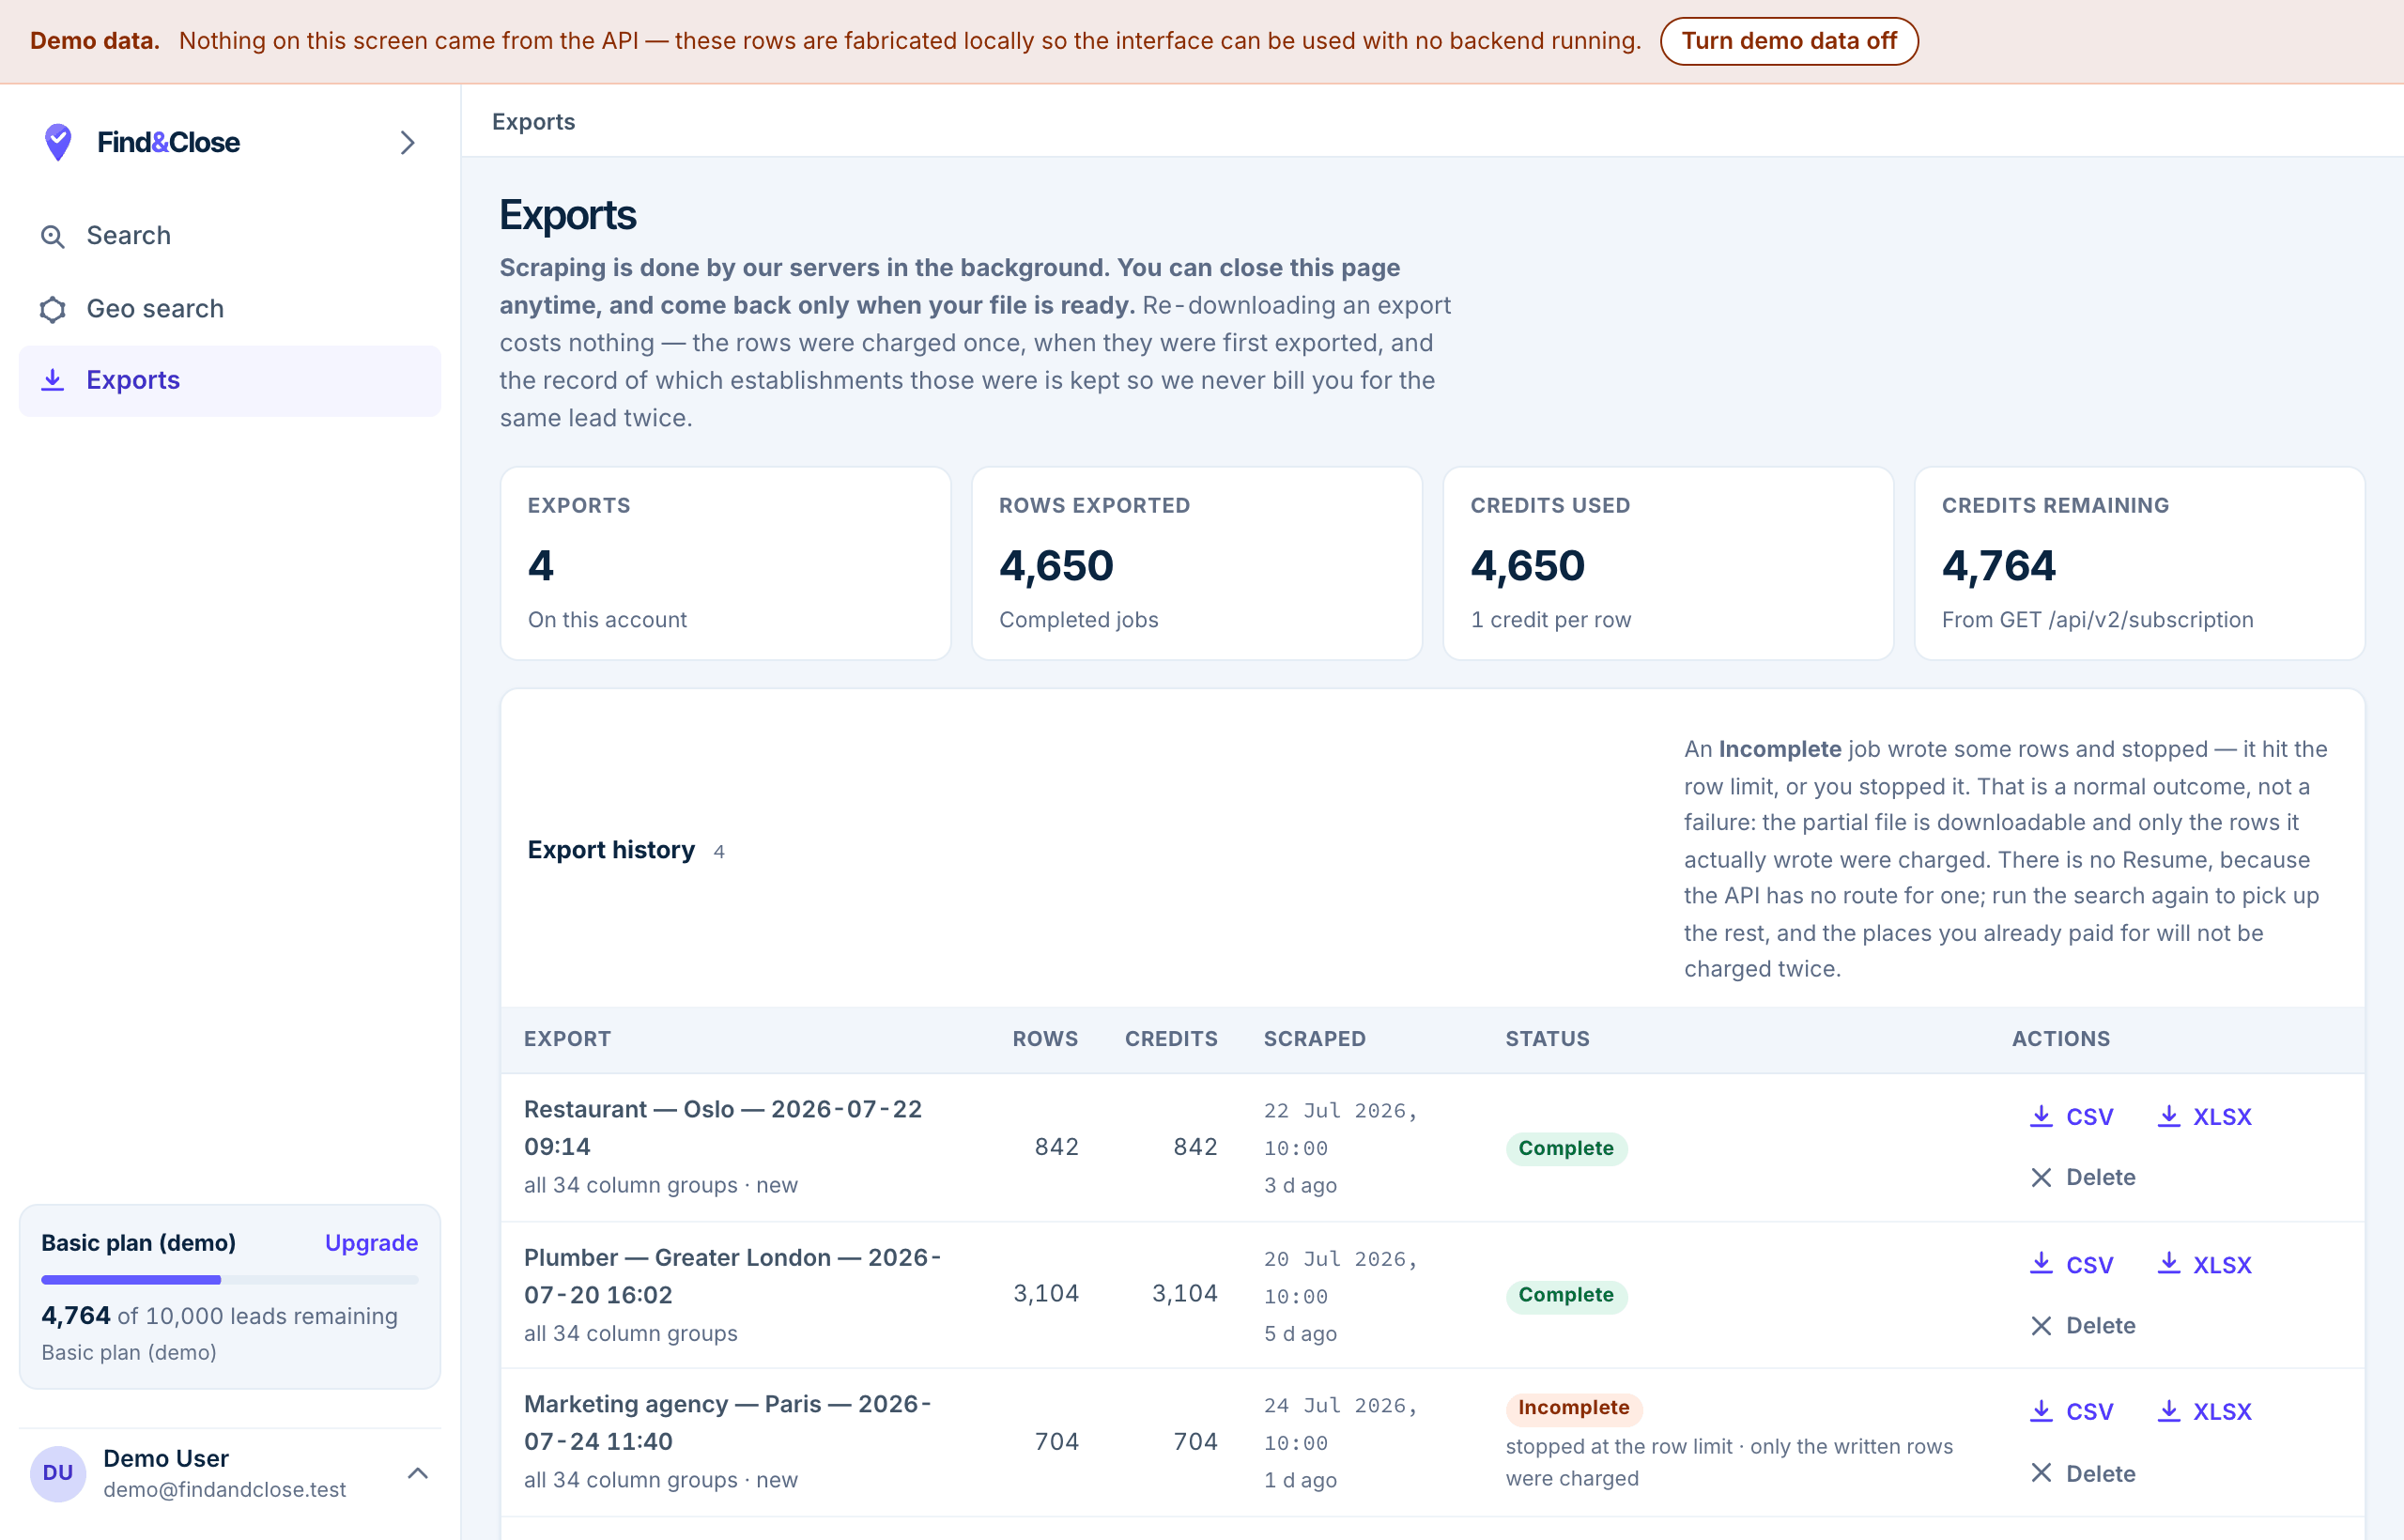
- 1Incomplete is not an error. Some rows were written and the job stopped early; Resume finishes it and bills only the rows it newly writes.
- 2Failed means no usable file. Nothing was charged — the note says so on the row.
The five statuses in one line each:
| Status | What it means |
|---|---|
| Queued | Accepted, waiting to start. Usually seconds. |
| Running | Writing rows. The progress figure climbs. |
| Complete | Done. Download it. |
| Incomplete | Partly done and resumable. Press Resume. Not a failure. |
| Failed | No usable file. Nothing billed. Try again. |
Finished files stay on the Exports screen and you can download them as often as you like at no cost. More: what happens after you press Export · my export is stuck on Incomplete
Open the file without breaking the accents
One last thing, because it catches almost everyone who works outside English.
If you open a CSV in Excel and see Østre Aker where it should say
Østre Aker, the file is not broken. Our CSV is UTF-8 with a byte-order mark,
which is correct; Excel just ignores it on some import paths.
Three fixes, best first:
- Export XLSX instead. It carries the encoding inside the file, so there is nothing to get wrong. Same credits.
- Import rather than open. In Excel: Data → Get Data → From Text/CSV, then set File Origin to 65001: Unicode (UTF-8). The preview shows the accents coming back before you press Load.
- Open it in Google Sheets, Numbers or LibreOffice, all of which read UTF-8 without configuration.
While you are in the import dialog, set the Phone, Postal code
and Reviews count columns to Text — otherwise Excel eats the leading
zero in a postal code like 0181 and reads a reviews band like 1-50
as a date.
Full detail: accented characters look wrong in Excel.
What to try first: one worked example
If you want a concrete first run, do this one. It takes about five minutes and costs well under a hundred credits.
Goal: dentists in Oslo who have an email address and at least four stars.
- Activities: type
dent, add Dentist. Add Dental clinic too if it appears. - Location: Country Norway → County Oslo → City Oslo.
- Press Search. Note the count. Somewhere in the hundreds.
- Tick "Has an e-mail on the website". Watch the count drop. That drop is the honest answer to "how much of this market can I actually email".
- Set Rating at least to 4.0 and Reviews at least to
1-50. The count drops again. - Look at the number now. If it is under 100, you can export the whole thing on the trial. If it is not, tighten a filter — the export takes every matching row and there is no way to take fewer.
- Press Export and check that the figure in the panel is the count you just approved.
- Download the XLSX, having trimmed the columns to the Cold email subset if you want a tidier file.
- Open the file. Check five rows against the
Linkcolumn: is the phone right, is the email the one you would have found on the site?
That last step is the one that matters. It is the only test of a data vendor that cannot be gamed, and it is exactly what the trial is for.
Where to go next
- Searching is free — exporting is what costs — the rule behind the whole pricing model.
- What the 14-day free trial includes
- Do I need a credit card to start?
- The 64 export columns, explained
- Role-split emails, contact pages and website technology columns
- Switching from scrap.io: your files keep working
- The lead filters, and when to use each
- Your lawful basis for contacting businesses — read this before the first campaign, not after.
Updated on: